Wednesday 30 May 2012

Even more dress biscuits

You may remember these dress cookies that I showed you recently, that I decorated using a stencil. I think they need a little something extra but I am not quite sure what yet?

Peacock Dress Cookie


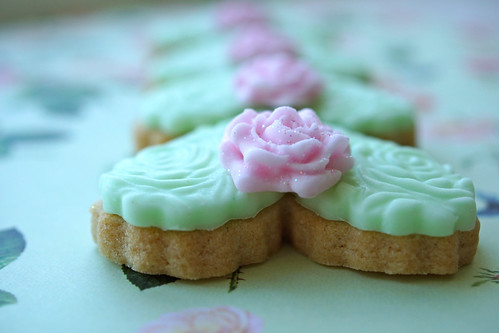
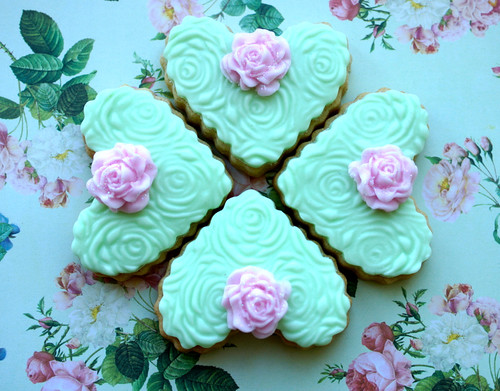
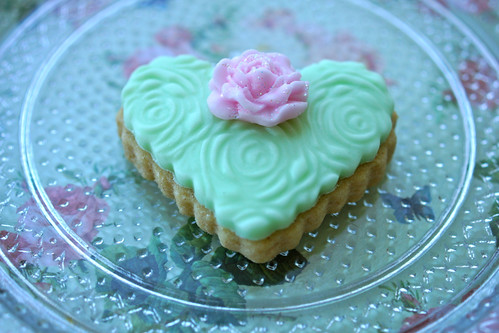
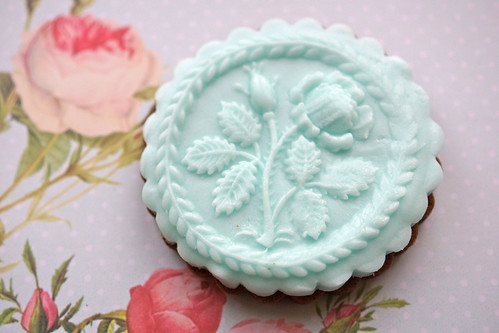
For these dress cookies, I have been using a cookie cutter by Autumn Carpenter that comes as part of a set. As well as the cutter, the set comes with three thin sheets of plastic for embossing the cookies. The ideas is you roll some fondant, use the texture mat to emboss the pattern and then cut the fondant and stick it on the cookie. So simple to do and looks really impressive


Roll out the fondant to about 5mm. Rub a small about of vegetable fat on to the fondant to stop in from sticking. Emboss the pattern onto the fondant using the end of a rolling pin and a circular motion.Alternately use the method from the Autumn Carpenter site.

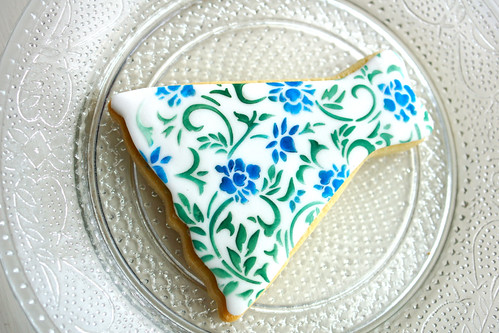
Try them both and see what works for you


Cut out  the fondant using the cutter, then gently life and stick to the cookie, use some ping gel or edible glue if you have it, if not a bit of water normally does the job well enough.


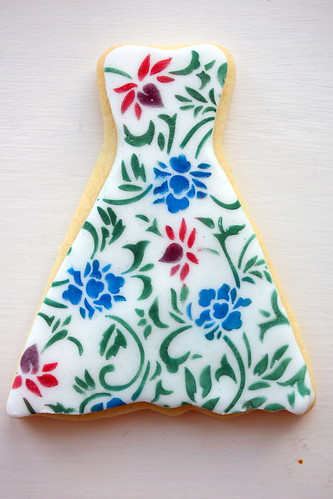
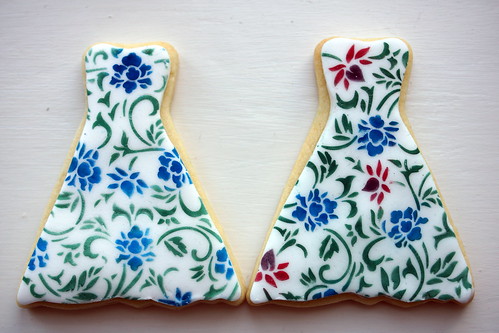
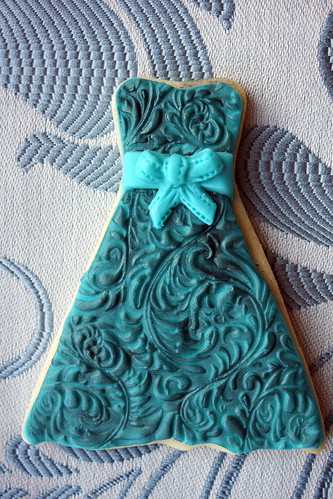
If you use the three texture mats that come with the kit, these are the embossed dresses that you will have. Other than the one on the left, which is always my favourite, they don't look much at this stage and need a little extra embellishment.


For the dress on the right, I used an edible paint pen to paint over the flowers and the swirls. This was an absolute disaster, the pen just flattened and tore at the fondant and the silver colour I was using did not show up, this went straight into my families "eat me" biscuit tin.

Blue dress cookie with bow


The the dress on the left, I added a bow that I had dusted with a white lustre powder.

Green dress cookie with bow
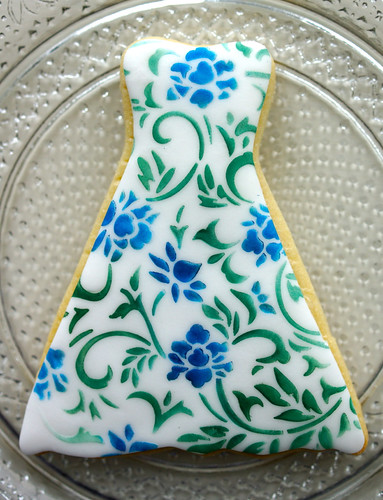
As I had just picked up some new lustre from one of my favourite, beautiful and well stocked shops, salt and pepper, I thought I would try it. I brushed another of these dresses with a Bridal Satin made by Squires Kitchen. The colour I used here is Verona (Green). It gives a sort of two tone effect and this lustre is satiny rather than sparkly. (This is my very favourite)

I added a bow in the same colour fondant that the dress is made from


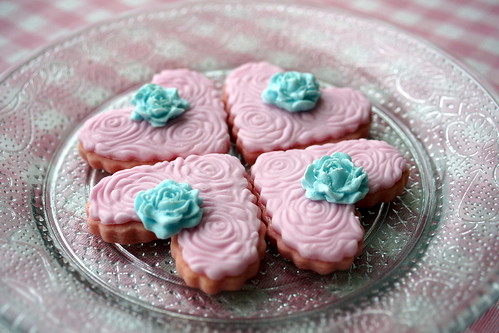
Then finally I added some lustre brushed daisies to another dress and here they all are together. Maybe the daisies are my favourite?

Which one do you like best?
That's all for today
Thanks for popping by and please call again soon

Keep up with my latest creations and inspirations in all these places

Follow Me on Pinterest


Friday 25 May 2012

Quest for a glamorous brownie or Brownies with bling

I love a brownie. Who doesn't? All that soft gooey chocolat-y-ness. The only thing is, they are not very glamorous are they? Try searching Google images with Brownie and you'll find an endless parade of uniform brown squares. Kind of the bridesmaid to the cupcake with all her showy swirls and sparkles and flowers and whatever else. Now, I know, what you are saying, it is whats on the inside that counts and that has been my mantra for many years. But, now. It's time. The quest for the glamorous brownie must begin and it begins here and now.

This is my first attempt at a Brownie with Bling that I showed you recently, the gold is the Squires Kitchen Gold Lustre.

Springerle Brownie

I wasn't sure about the red, so I tried a different colour. Its a very different look isn't it?. I added a little Sugarflair edible lustre in dusky lilac to the roses for a bit of extra blinginess.

Pink Roses Brownie

Anyone fancy one?

Brownies for tea

If you want to have a go, this is what you will need

Brownies baked in an appropriately sized sheet / square pan for your recipe

I've used the traditional brownies from The Hummingbird Bakery Cookbook by Tarek Malouf, which is my most used cookbook. I may have mentioned it before?  I have searched high and low and managed to find the recipe here.

This is just the easiest ever recipe to make, didn't even get out my mixer.

Double Rose Springerle Mould from House on the Hill
Chocolate sugar paste / fondant you can of course use any kind of fondant, but, I have a feeling that brownies will only look right with chocolate
Another colour or colours of fondant if you want
Round cutter about the same size as the mould
Lustre dusts if you want

Use the round cutter to cut the brownies into circles about the same size as the design on the mould you are using. Any large leftovers can be cut into smaller shapes for eating as they are, decorating later or making brownie pops.

When I went to make these. I thought, these'll be easy, just do as for my old rose cookies, mould the sugar paste and add paint on the petal dust colours right? Uh, no. Turns out only metallic or pearlescent colours show up.

This is such a deep mould, whether you are using one or two colours, you need to make two little balls of fondant and press them into the rose part of the mould and then two tiny balls to push into the rose buds between the roses. I forgot to do the rose buds for my first mould as you can see from the pic below.


Now for the chocolate sugar paste

1. Roll the chocolate sugar paste out about 1cm thick
2. Press the mould on top - firmly and evenly to make the impression.
3. Lift the mould off by pressing upwards on the metal ring at the top of the mould and there should be a beautiful impression. Check you are happy with the quality of the moulding, if not, take off the coloured fondant, knead the chocolate fondant into a ball and roll and mould again. *
4. Use the same round cutter to cut out the design from the mould
5. Carefully lift the sugar paste and place on top of one of the brownies. (You shouldn't need to use any edible glue because the chocolate sugar paste is quite sticky).
6. If you want to gild the lily, add your lustre dust(s)

Enjoy!


* If a rose or bud remains in mould
Sometimes one of the roses or buds remain in the mould after it has been lifted off the sugar paste. Just gently tease them out with a toothpick or a small plastic cutting tool and gently place them in position and press down lightly.

Coloured Fondant has squelched out a bit
Use a slightly smaller ball of fondant.next time. For this time try using a toothpick to gently push back the coloured fondant towards the rose. Even is the mould is not perfect, these will still get eaten!


That's all for today
Thanks for popping by and please call again soon

Keep up with my latest creations and inspirations in all these places

Follow Me on Pinterest


Tuesday 22 May 2012

Dahlia Cookies

I've never been blessed with the sort of artistic skills that lend themselves, to painting or moulding things by hand, which is why I love that so many moulds are available now for sugar craft and they save so much time. I recently acquired some lovely moulds from sunflower sugar art, (Sunflower Sugar Art USA) including this dahlia one.

Dahlia


These are the cookies I made with the mould


Three Dahlia Cookies


These cookies look so lovely just as they are.

We wouldn't want to over-egg the pudding or gild the Lily now would we?

Well, maybe ...


I took the ivory one first and brushed on a little EdAble Art dust in pearlised toffee.

Golden Dahlia Cookie


The first Eau du Nil coloured one, I brushed with Squires Kitchen Bridal Satin in Delphinium

Pale Teal Dahlia Cookie


The other Eau du Nil one, I brushed first with a Squires Kitchen Gentian petal dust and then brushed the Bridal Satin in Delphinium over the top

Blue Dhalia


Here they all are together. Look a bit different from before?

Dahlia Cookie Collage


I can't make my mind up which colour I like the best.

Dahlia Cookie Close-Up Collage

That's all for today
Thanks for popping by and please call again soon

Keep up with my latest creations and inspirations in all these places

Follow Me on Pinterest


This is how to use the moulds to make the cookies. All you need is

Sunflower Sugar Art Dahlia mould (or a similar one)
Sugar paste / Fondant coloured however you fancy
A little vegetable fat (Trex)
Round cookie cutter about the same size as the mould
Batch of sugar cookies cut with the round cutter
Petal dust / luster dust if you want to use it and a paint brush.


Dahlia


I coloured some shop bought sugar paste in ivory and in teal, then set about moulding my flowers. This is quite a large mould so I used the freezing method, I am not sure whether the manufacturers recommend that we should put their mould in the freezer, but, it works for me.

Rub a little vegetable fat between your palms to help stop the sugar paste sticking to the mould.
Roll the sugar paste into a ball a little smaller than a golf ball and then flatten it and push it into the mould. Push down quite hard with the heel or palm of your hand to get the sugar paste into all the nooks and crannies.

You will either have too much or not quite enough sugar paste in your mould

Too much - You need to level off the top by sliding either your finger, a palette knife, a cocktail stick or anything else you have handy that you think might work across the top of the mould. (Be careful not to but the mould with anything sharp, or yourself)

Not enough - add a small ball into the middle and press it down.

When you have the right amount of paste use your finger to polish around and tidy up all the edges so that  the edges are smooth and tidy.

Pop the mould in the freezer for around 20 minutes or if you are like me, till you remember it is there. Mine sometimes get left overnight ...

Push the flower out by gently flexing the mould at the edges. This should pop out quite easily, if the paste still seems stretchy pop it back in the freezer for a bit longer.

This is the moulded flower. Beautiful.

Moulded Dahlia Flower


It is best to leave these out to dry overnight, before you continue as they can be a bit sticky as they warm up from the freezer. I usually dry them on a baking / cookie sheet with baking paper on top so that it doesn't stick.

All you need to do then, is stick these on to a cookie using edible glue or piping gel. I stuck mine onto chocolate sugar cookies about the same size as the mould. The mould is about the same size as a cupcake and they look lovely there too.

Dahlia Cupcake


Friday 18 May 2012

Heart Cookies. How to

Pink heart cookies


My first post was a picture of these cookies and a promise I would tell you how to make them. I then realised my promise was a rash one as I hadn't taken any pictures of how to do it. I have now found a spare hour or two, baked a fresh batch of sugar cookies and taken some pictures too.

Untitled

  1. Used the smallest cookie cutter from this Wilton "From the Heart set" to cut out the cookies which are made using my usual sugar cookie recipe.
  2. Coloured some ready made fondant with a small amount of Wilton leaf food colouring.
  3. Rolled the fondant out a little less than 5mm using my 9" rolling pin with guides to get an even thickness
  4. I used an embossing or texture mat from the Autumn Carpenter floral texture mat set and the end of my rolling pin to emboss the pattern
  5. Cut out the shape of the cookie in the fondant using the same cookie cutter I used for the cookies
  6. Carefully lifted the fondant
  7. Stuck it on to a cookie using some edible glue
  8. I moulded some roses using the Roses Galore set by First Impressions
  9. Couldn't resist adding some baby pink edible glitter to the roses
  10. Carefully stuck these on top of the cookies
There is a bit of controversy over edible glitter at the mo, click here for the latest UK guidance. The roses can be easily removed from these cookies for anyone that does not want to consume the glitter.


Follow Me on Pinterest


Here are the finished cookies, what do you think?

Green heart cookie

Heart cookies

Spring rose cookie


Saturday 12 May 2012

Old Rose Cookies (Part two)

This is how ...

Old rose cookies

I know it is very immodest of me to say so, but, I love these cookies really rather a lot.

I ordered this springerle mould from the wonderful House on the Hill. Isn't it beautiful? The moulds are often associated with Christmas and I couldn't resist hanging it in my ancient apple tree to take a picture. Technically this is not such a great picture, but I kind of like it. This mould is "Round Rose" 5688.


Springerle moulds are intended to make little cake / biscuits, you can find recipes for Springerles at House on the HIll. They also have info on paper casting that looks A-MAZ-ING.

The traditional recipe for Springerles uses Bakers Ammonia or Hartshorn and this is not always that easy to get hold of (House on the Hill stock it), Martha also has a recipe for a Springerles that uses baking powder. I really must get round to baking the traditional springerles ... one day ...

For now, I have used these beautiful moulds to mould sugar paste to decorate my cookies.


First of all I made some sugar cookies, using my usual sugar cookie recipe, but, replacing 50g of flour with 50g of cocoa powder, just 'cause I fancied chocolate for a change and cut them out using a fluted cookie cutter about the same size as the mould. This cookie mix has such a velvety texture, it feels and smells gorgeous.

I coloured some sugar paste with a little Wilton teal colouring and then rolled it out using marzipan rollers to get an even thickness. The first one I tried I rolled the standard 5mm, but these are such lovely deep moulds, I found this was not quite thick enough, so I turned the marzipan rollers on their sides and rolled out - about 1 cm thick.


To stop the sugar paste from sticking to my mould, I rubbed a little vegetable fat (Trex / Crisco) between my palms and gently smoothed this on top of the sugar paste. Icing sugar or cornflour is usually recommended but I like the Trex.

Press the mould slowly and firmly onto the sugar paste, then lift off to reveal the impression. Wowzer!


Blue Rose Cookie

This is quite a traditional springerle look and lovely like this. Check that you are happy with your impressions from the mould - if not roll and mould again.

Use your cookie cutter to cut out the sugar paste and gently lift on and stick to your cookie. You may need to use a little edible glue or icing gel to make it stick. If you don't have any, a little water usually does the trick.

I wanted to paint my mould and the colours I have used, in the top picture, are Sugarflair's Shimmering Pink and Squires Kitchen Bridal Satin in Myrtle. As I was painting these, I heard, my three year old son, who was up until this point quietly settled in his bed, "Mum! Mum! Mum! it's morning time, I'm ready to get up!" It was eight thirty at night and he had only gone to bed an hour ago. My goodness.

Also looks pretty  in pink!!


That's all for today
Thanks for popping by and please call again soon

Keep up with my latest creations and inspirations in all these places

Follow Me on Pinterest


Watch this space, because I just may have another mould or two to play with ...


Thursday 10 May 2012

Old rose cookies

Old rose cookies by The sugar mice
Old rose cookies, a photo by The sugar mice on Flickr.

A preview of some cookies that I have made. More to follow soon.

Tuesday 8 May 2012

Peggy's Classic Victoria Cake

Well, here it is, my version. What do you think?


Not quite as beautiful as Peggy's, I didn't have quite enough buttercream, (or quite enough time, as ever) as you can probably see form the thin bits. I am quite pleased, would like to have another try, to try and get it better, but, then, there are so many other loverly cakes to try in Peggy's book.

And it was delicious too!


Monday 7 May 2012

Peggy Porschen Boutique Baking

Peggy's New Book


My husband would no doubt confirm all to quickly that I have far to many books in my home library already, cake books in particular.

It was Peggy's "Favourite Cakes and Cookies" that first started off my small obsession with bakeorating. I can't quite remember why I picked it up at my local bookshop, maybe that I had never before seen anything quite like those cupcakes on the front, (Really must try to make those one day). I was eagerly awaiting the new - Boutique Baking. In fact I had it on pre-order for quite some months prior to its release.

This book is truly beautiful and does not disappoint. Peggy has the knack of making such beautiful cakes seem within reach of mere mortals.

I have already tried the Chocolate heaven cupcake recipe. Unfortunatley I can't show you any pictures, because my piping was ruined by a tiny bit of un-melted chocolate chip that got wedged in my icing nozzle and rather ruined the look of these delicious morsels and I was too embarrassed to share them with you. I sent my husband off to work with them (you see I was even to embarrassed to let people I know see them!) and he can confirm that they were quickly devoured and proclaimed delicious. Hubby though, thought the icing was too soft and didn't hold it's shape very well. They were quite time consuming to make, I made them over two nights, well worth the effort.

I am going to try to make the Classic Victoria Cake next. This features piped scrolls and flour de Lys. Piping is not my strongest decorating skill and seems to be becoming my baking nemesis, in fact, I am rubbish, so ... deep breath ... lets see how it goes

If you'd like to try or see some recipes from the book, check out these at You and Your Wedding

Or the Classic Victoria Cake can be found on the Mulberry Blog


Follow Me on Pinterest

Peacock Dress biscuits

Peacock Dress Biscuits


Peacock Dress Cookie


I showed you a sneak peak of these the other day. If you want to have a go, this is what you will need to do it. The pattern is created with a stencil. I saw this done in the amazing Lindy Smiths Contemporary Cake Decorating Bible below, which every cake or cookie decorator should own. Lindy is the queen of cake and cookie stencils, check out her stencilling Gallery


I loved the effect and really want to try it but was a bit reticent as I thought that the stencil would move around and the colour would get underneath and make a mess.

I used the Chinese Floral Circle (L104) stencil that I got it from Lindy's shop.

Time to get started. The technique is pretty much as you would imagine really, roll our some sugar paste, place the stencil on top, use a fondant smoother  / polisher to gently push the stencil on to the sugar paste and make it stick. Take some petal dust, I used "gentian" and "holly" from Squires Kitchen and a paint brush. I found a number 4 watercolour natural bristle brush worked best, anything smaller tended to make dimples in the sugar paste.

Gently brush the petal dust onto the stencil, then when all done lift up and your done. I love the wavy line on the bottom of this dress cutter. From Autumn Carpenter.

Stencilled dress cookie


I tried different colours and more colours

Some tips

  • Cut out your cookie shape and attach to your cookie using piping gel or edible glue.
  • The petal dust will colour the sugar paste, so you can't use the offcuts again for this project.
  • Between each stencilling, I placed the stencil on a piece of kitchen towel and gently rubbed it with a rolled up ball of kitchen towel to clean it.
  • Be careful to put the stencil the same way up each time.
  • After making a couple, I realised I was wasting time dusting bits I was going to chuck away, so I changed my technique, I rolled out the sugar paste a bit thicker than required , then cut it with my cutter and then rolled it to the required thickness. If you do this the past is only a little bit bigger than you need, so you don't waste so much
Not sure which one I like best. What do you think?

Dress cookies


I still have some dress cookies left, so next I am going to use the texture mats that come with the set and show you the effects that can be created with these.


Follow Me on Pinterest
www.facebook.com/TheSugarMice

Friday 4 May 2012

Peacock dress biscuits

Well. It's been one of those days today, you know, the sort where you sit down at nine o'clock and realise that you haven't had a drink since you left work at 4 and I am talking any liquid refreshment not the alcoholic sort.


I got chance to make these peacock dress biscuits a night or two ago and just had chance to grab some pictures before the light faded, so thought I would share a sneak preview with you. What do you think?


DSC00813


Thursday 3 May 2012

Too much pink?

I have just realised that nearly everything I've made recently is PINK. I am not sure how this happened but it clearly won't do, but then, you can never really have too much pink can you?

I have just received this lovely dress cutter and texture mat set by Autumn Carpenter, seems about time to remedy the pink situation.


I whizzed over to Design Seeds for some colour inspiration where I found this lovely peacock.


So, I'm just off to bake a batch of biscuits and then we'll see what happens next ... peacock dresses maybe?

Follow Me on Pinterest