Saturday 30 June 2012

Blossoming Caramel Chocolate Brownie Cupcakes

When I was making these, I was thinking that they would be another glamorous brownie, but, I am not really sure whether a cupcake brownie can qualify as a glamorous brownie. They are quite glamorous though, aren't they?


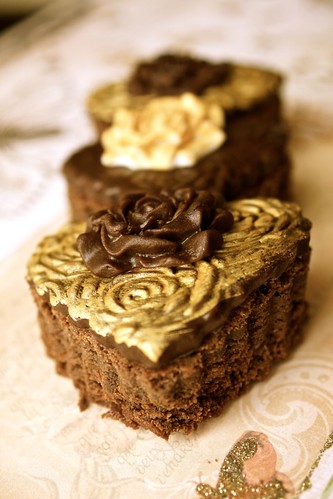
These are easy to make, hardly need any specialist equipment and they taste really delicious too. I made my chocolate brownie cupcakes using the Hummingbird Bakery traditional brownie recipe, but, you can use any recipe you like from scratch or from a box. When the batter is mixed, fill cupcake cases about two thirds full, just as you would for a regular cupcake and bake. You will need to bake for about 10 minutes less than your recipe states. Remember that brownies are cooked when they are still a bit undercooked in the middle!


When the brownies come out of the oven, they will have beautifully risen domed tops and your house will be filled with the delicious smell of chocolate. Don't let your heat sink as the brownes sink a little in the centre. This is what gives them their lovely fudgy texture and when they are decorated you won't notice

This is all you need to decorate them.

1. A little chocolate sugar paste (fondant)


2. A teeny tiny blossom cutter plunger


3. A star shaped nozzle. This is a Wilton 2D
4. A batch of caramel butter cream (recipe follows)

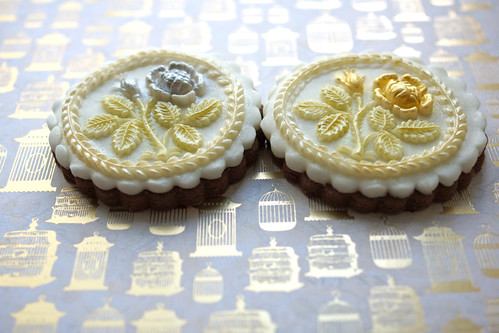
Making the teeny-tiny chocolate blossoms

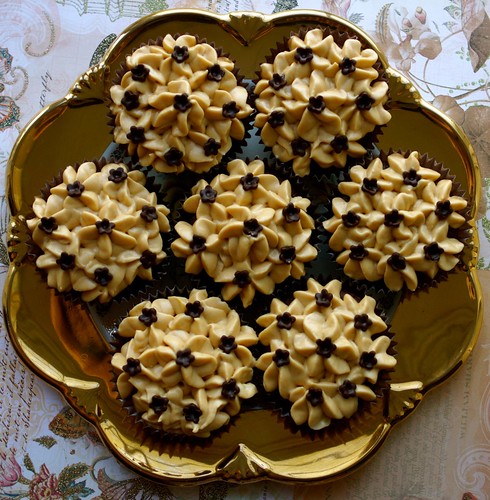
If you can, make your teeny-tiny chocolate blossoms the day before you are going to use them. It doesn't really matter, giving them a chance to dry out a bit means they keep their shape better when you use them. You need 7 blossoms per cupcake brownie, this recipe gave me 12 cupcake brownies, so that was 84 blossoms! Always make a few more for luck.

1. Roll out a small amount of chocolate sugar past thinly
2. Cut out the blossoms using the cutter.
3. Lift the cutter with a bit of a sideways flick - you should have your newly cut blossom inside.
4. Shape the blossom by pressing down the plunger gently onto a foam sugar craft pad if you have one.
(I usually just press my forefinger and middle finger together and plunge the blossom gently between the two. Place the blossoms somewhere to dry.)

Caramel Buttercream

Blossoming Caramel Chocolate Brownie Cupcake 1
Buttercream is one of those really flexible recipes that you can't really go too far wrong with. The traditional English recipes vary from between equal amounts of butter and icing (powdered / confectioners) sugar to twice the amount of icing sugar to butter.


For this caramel buttercream I used equal amounts:

250g / 8oz / 2 sticks butter (softened)
250g / 8oz / 1 cup icing / powdered / confectioners sugar
Tin or jar of caramel (at least 200g / 6oz)

The tin of caramel I had weighed a little under 400g / 12oz. You actually only need about 200g (6 oz) to get a good caramel flavour, I didn't have any use for the rest of the can, so I just tipped it all in. For buttercream you need to use really soft butter. Leave the butter at room temperature for a couple of hours to soften up, or give it 10 seconds on low in the microwave.


Method

Put the butter into your mixer and beat really well (or use a hand mixer). You need it to be really smooth. Star nozzles have a narrow centre so any lumps of butter will get stuck. When the butter is soft and smooth add about half the icing sugar and beat until really well incorporated, then add the the rest of the icing sugar ad beat until the butter cream is looking lovely and soft and fluffy. Finally add the caramel and beat until just incorporated.
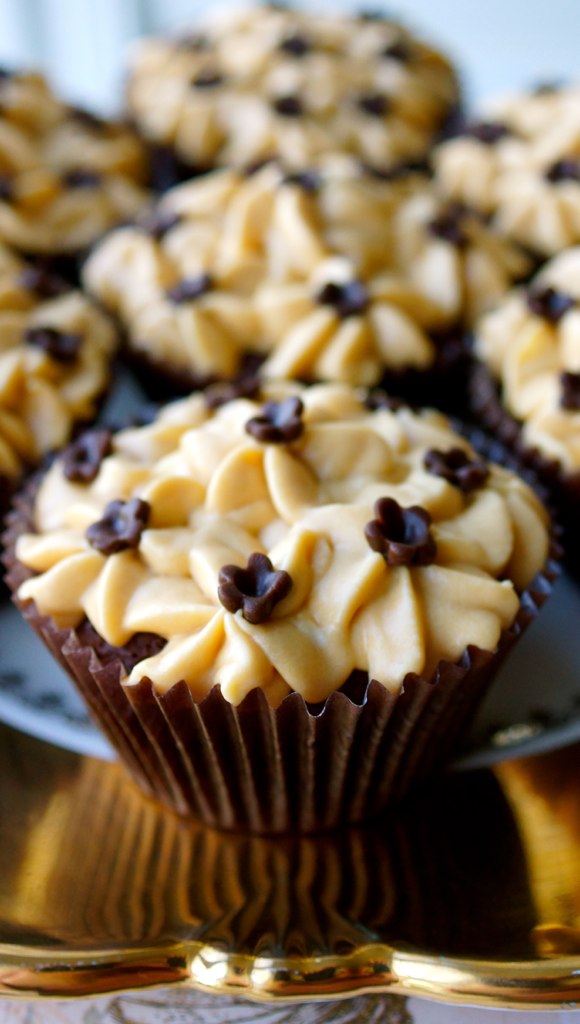
Decorating

Put your piping nozzle into a piping bag and fill the bag with the caramel buttercream. Pipe a couple of test flowers. If the flowers don't hold their shape, pop the piping bag in the fridge for 10 minutes or so to firm up a little.

Start by piping a flower in the middle.

Hold the piping bag upright and pipe slowly, then pause and lift slowly.

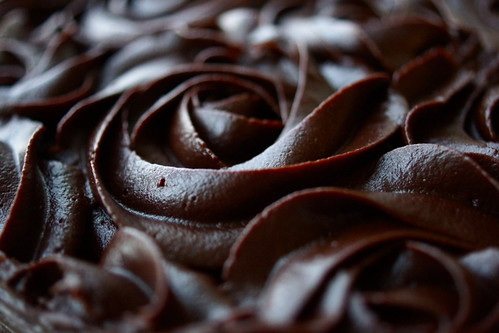
Pipe six flowers around the edge

Pipe a final flower on top of the one in the centre

Then carefully place a teeny-tiny blossom onto each flower


Blossoming Caramel Chocolate Brownie Cupcake 4
EXQF2SZE6T63

That's all for today
Thanks for popping by and please call again soon

Keep up with my latest creations and inspirations in all these places

Follow Me on Pinterest


Tuesday 26 June 2012

Blue for you Brownies

I decorated some brownies with this lovely rose. I can't decide whether to leave them alone or add some lustre or colour.


What do you think? I tried some experiments with some different colours and effects..


Plain (top)
Subtly Frosted (bottom left)
Glamourously Gilded (bottom middle)
Tasteful Pastels (bottom right)

More to follow when I have decided.


That's all for today
Thanks for popping by and please call again soon

Keep up with my latest creations and inspirations in all these places

Follow Me on Pinterest


Saturday 23 June 2012

Springtime Springerle Birthday Biscuits

It was one of my very best friends Birthday's recently so I decided to make her some biscuits for her Birthday and I made the biscuits that you see below. She loved these, in fact she didn't want to eat them because she said they were too pretty

Chocolate and Red Springerle Moulded Heart Cookies

I like these well enough, mainly because I am totally in love with these amazing Springerle moulds from House on the Hill, but, something about them didn't feel quite right. Somehow they just weren't "springtime" enough.

I mixed up some fondant in springtime colours to try that.

The weather here in England has been most un-spring-like just of late, so we really needed something to break through the cold grey days and all the rain we have been having. Then, I had a flash of inspiration, I didn't have to use the cookie cutter that was the closest shape to the cookies. Much activity followed as I tried as many different shapes as I could find, until I settled on this, much used one, which just seemed to frame the design really nicely.


I quickly baked a batch of sugar cookies cutting them out with this cutter so, things were coming together very nicely. These are made just the same way as my Old Rose Cookies, except you use the mould shown here and this cookie cutter which is the smallest one from Wilton's from the Heart set.

This is how they came out.

Amo Te Springtime Cookies

Look a bit different don't they?

Amo Te Springerle Cookie Pink

Amo Te Springerele Cookie Blue

Amo Te Cookie

I've just had an idea how to make these even better, so watch this space!


That's all for today
Thanks for popping by and please call again soon

Keep up with my latest creations and inspirations in all these places

Follow Me on Pinterest


DSC01519

Thursday 21 June 2012

Dark Chocolate Rose Cake

It is carers week in England this week and in support of this we had a charity bake sale at work. The charities supported were an alzheimer's charity and a carers charity. I know that I should know the names of the charities, but, it has been a bit of a busy week and I forgot to make a note of them. You're here to see the cake anyway, so hopefully you'll forgive me as I did help raise some money with this cake. I am going to tell you about this chocolate and banana cake that I made today and I'll tell you about the Earl Grey Tea cupcakes that I also took to the bake sale another day

Chocolate and banana layer cake


Underneath this chocolate frosting, is a four layer cake. Two layers chocolate and two layers banana. Both these sponges are based on a traditional english victoria sponge recipe. I wish I had a picture of the inside to show you, but I didn't think it right to cut a slice before taking it to the bake sale, so you'll have to make do with more chocolate roses


Chocolate Frosting Roses

The recipe for a traditional English victoria sponge has been passed down from mothers to their daughters through many generations and once, you know it you will never need a written recipe to make it again.

For the cakes you need equal quantities of:

Butter or margarine
Caster / Superfine Sugar
Cake or self raising flour
6 Eggs (You will need 3 eggs for each pair of cakes)

And

3 bananas
50 grams / 2ozs cocoa powder

You will also need two 8" cake pans, lined with baking paper or sprayed with your favourite non-stick baking spray

Make the banana cake first
Start by weighing three eggs, in their shells. You will probably find that all three weigh between 150 and 200 grams / around 8 ozs

Next weigh out the same weight (as the eggs) of the butter or margarine and sugar. Cream these together in your mixer, with a hand mixer or a wooden spoon if you are feeling strong. You want to cream these together for a good five minutes or so until they look quite pale in colour.

Crack the eggs into a bowl or jug and whisk gently with a fork to break them up a little, then slowly add these to the butter and sugar and beat them in.

Weigh out the same amount of flour and carefully fold this into the mixture. One you have added the flour only mix until it is just incorporated, over mixing can make the cake turn out a bit tough.

If when you are mixing in the eggs, the mixture looks like it is separating, add a couple of spoons of flour with the eggs.

To make this into banana cake, add one banana for each egg, mash the up with a fork first and then just stir them in. Over ripe bananas are best.

Divide the mixture between the two pans and then bake at 180 C / 350 F for about 25 minutes. Check it after 20 minutes and it may need up to 30 minutes. The cake is cooked when it feels springy to the touch.

Next the chocolate cake
Many modern recipes use quite large amounts of chocolate and as a result of this can be quite expensive to make. This is a very traditional and simple to make version that just uses cocoa powder for the chocolate flavour.

Repeat everything as for the banana cake except before weighing out the flour, weigh out 50 grams / 2 ozs of cocoa powder then make this up to the weight of the eggs with the flour. Oh, and don't add the bananas. Bake it just the same too.

Now the piece de resistance -

Chocolate Roses


The Chocolate Fudge Icing

This is what you need:
250ml / 1 cup whipping cream65g / 3 tblsp golden syrup350g / 12 oz  high-quality dark/semi-sweet chocolate1 tsp vanilla extract75g / 5 tblsps unsalted butter, cold,cut into cubes

Start by chopping up the dark chocolate and put it into a large bowl.


Next bring the cream and the golden syrup to the boil in a small saucepan. When boiling remove from heat and (being careful because it is hot) poor into the bowl over the chocolate.


Now leave it there for one whole minute or even a little longer. Use a timer.


The chocolate will now be starting to melt


Using a balloon whisk, starting in the centre of the bowl, make very small circular movements to gradually incorporate the chocolate into the cream. Be patient, it will look like nothing is happening for quite some time, then you will start to see glossy chocolate ganache forming. Now, you can start to make your movements bigger and stir slowly till all incorporated. (Patience really is the key here, not a job for a day you are in a rush)


Finally stir in the cubes of chocolate and the vanilla extract.


At this stage you will have a runny chocolate mixture. If you want a smooth look, just pour this over the cake. (Put the cake on a cooling rack with a tray underneath). If you want to pipe the icing, leave it to firm up. In the UK an hour or two at room temperature is usually about right, if you live in a warmer climate, you may want to put it in the fridge for a while. Keep checking it. You want it firm enough to hold its shape without being too firm to pipe. 

Now to layer them up
When the baked cakes are cool layer them up with either a little of the chocolate fudge icing or I decided to use some Dulche De Leche (caramel) from a jar.I piped the roses onto the cake using a Wilton 1M nozzle, a arge star shaped nozzle.When piping the roses, I imagine I am piping each one onto a cupcake. Start with the one in the centre and just work your way out. Slap some more icing on to the sides and smooth. You would not believe how chocolatey this cake smells! Job done.


That's all for today
Thanks for popping by and please call again soon

Keep up with my latest creations and inspirations in all these places

Follow Me on Pinterest


DSC01923


Sunday 17 June 2012

Blossoming Caramel Chocolate Brownie Cupcake 4

Sneak preview of these Caramel Buttercream topped chocolate brownie cupcakes, decorated with chocolate blossoms

And yes, they taste as good as they look

Thursday 14 June 2012

Golden Rosemantic Brownies

These are the second brownies I have made in my quest for a more glamorous brownie. I wanted to make something small and dinky for my friends who just like a little taste of something delicious and chocolatey without ruining their figures.

Chocolate Brownie with gold and roses


If you want to have a go at these, you will need:


  1. Chocolate Brownies baked in an appropriately sized sheet pan for your recipe. I used this recipe from the Hummingbird Bakery Cookbook
  2. Chocolate Sugar Paste
  3. An embossing sheet with a rose pattern, I used one from the Floral Texture set by Autumn Carpenter
  4. Rose Mould (The one shown here is by First Impressions)
  5. Heart cutter (This one is part of the "From the Heart" set by Wilton
Metallic Gold Edible Paint (This one is by Rainbow Dust)p-lo0k~"? []'|

Chocolate Brownies with roses


You will need to start by cutting out the heart shaped brownies with your cutter. This is best done the day after baking, as the brownies can be quite crumbly when just baked.

From then on, you make these the same way as my heart cookies click here for the instructions, except that you will need to paint the sugar paste, or the rose with the edible gold paint. The gold paint dries quickly, so you need to paint it on quickly and don't go back over any areas because this usually pulls off the paint.

Enjoy!

That's all for today
Thanks for popping by and please call again soon

Keep up with my latest creations and inspirations in all these places

Follow Me on Pinterest


Chocolate Heart Brownies

Saturday 9 June 2012

Ahhhh Swamp Monster

This cake isn't quite my usual style! I made it for my nephew's Birthday today. He has a small jelly obsession and the cake underneath all of this is made with lime jelly, so I am hoping that he will really like it.

Swamp Monster


I have made this cake from the very talented Debbie Brown's Book Gorgeous and Gruesome cakes for children. If you have any children's cakes to bake, this book is indispensable, lots of cakes for girls and boys and everything in-between!

One of the best things about all of Debbie's cakes is that you don't need a lot of specialist tools to make them. (I rather like a few specialist tools, they hep to make up for my lack of artistic talent!). My cake isn't quite up to Debbie's standards, but, I am happy enough with it and so it seems were my nephew and his family.


Whilst I was taking these pictures, I accidentally pressed a button on my camera, I still don't know which one and took the picture that you see below. I don't know what I did - must read some more of my camera book, but, I kind of like the affect


That's all for today
Thanks for popping by and please call again soon

Keep up with my latest creations and inspirations in all these places

Follow Me on Pinterest

Friday 8 June 2012

Birthday Season

It is Birthday season in our household, my husband's and also my father in law's Birthdays were on Wednesday, my Nephew's is on Saturday and my son's 4th Birthday is coming up next month.

This is the Birdhouse Birthday cake that I made for my husband. My father in law, does not eat cake, which, in a way is fortunate, because goodness only knows how I would have found time to make another cake this week.

Hubby's Birdhouse Birthday Cake


My husband likes wildlife, we have lots of nest boxes with cameras around the garden and initially, this was going to be a realistic looking bird box with maybe a blue tit along side.

I always think that Birthday cake should be a nice vanilla sponge or maybe a chocolate cake with a bit of extra special icing, however, the hub thinks that Birthday cake should be fruit cake. (I think that fruit cake is for Christmas and Easter.) Well, he had his way and this is a fruit cake - well, it was his Birthday.

I went to my local sugar craft shop on Saturday with my little lad and looked at the sort of wood brown coloured icing for a bird box, but, I couldn't quite bring myself to buy it, now if it had been a chocolate cake, I could have quite happily bought chocolate sugar paste and that would have made perfectly nice wood.

After convincing my son, whose favourite colour today is pink, that Daddy probably doesn't want a pink Birthday cake, we bought the lemon yellow and pale blue with a little grey ... and some pink that I will soon be using for something else!

This is my first go at modelling any sort of figure out of sugar paste, I think this little bird came out OK, but, there is always room for improvement.

Bird on birdhouse


I won't go through everything I did to make this one, as it might take a little time, but I'm happy to answer any questions that you may have.

One last view before I go and I'll just mention that next I am making a swamp monster cake, one of the wonderful Debbie Brown's designs for my nephew's Birthday. A cake with lime jelly in it!

Birdhouse Birthday cake


That's all for today
Thanks for popping by and please call again soon

Keep up with my latest creations and inspirations in all these places

Follow Me on Pinterest


Tuesday 5 June 2012

Old Rose Extravaganza - colour experiments

You may remember these old rose cookies that I showed you a while back. If you missed them, check them out here

Old rose cookies

As I am still new to the world of sugar and decorating, a lot of what I do, is about playing with different colours to see what works and that is what I have done here. These cookies were made using this beautiful mould from House on the Hill, BTW be careful if you stop by there, they have so many beautiful moulds, you won't be able to buy just one. Each time I visit, I see more moulds that I cannot live without.


I like a bit of colour and shine and sparkle, if your style is more understated, the plain mould looks so lovely, it almost seems a shame to add anything. This is the pale teal colour I used before.

Blue Rose Cookie


I mixed up some different shades of sugar paste using ivory and ....


 rose gel colours from Wilton and moulded the paste with the Springerle mould as before.


I was lucky enough to visit the Squires Kitchen show earlier in the year and whilst I was there picked up their gilding kit. (It was round about my Birthday, so this was one of my Birthday presses)

Pink Springerle Mould Cookies

The lustre colours I've used are the light silver, light gold and burnished copper from this kit along with a Bridal Satin in Myrtle, also by Squires Kitchen that I used before


Here's some in ivory

Ivory Old Rose Cookies


... and all the colours together. You will see that the burnished copper is less successful on the ivory and teal colours as a little of the colour sometimes goes astray.


... and, if one rose isn't enough, how about two? This is the House on the Hill Double Rose Mould that I used for my Sprningerle Brownies. More of these soon.


And finally ... with the gilding kit comes some gold and silver leaf, I couldn't resist having a go at gilding one of these. Boy, was this hard and only partially successful. I thought I would show you, if only for a laugh, oh, and it was also really difficult to get a good picture. Well, here it is


That's all for today
Thanks for popping by and please call again soon

Keep up with my latest creations and inspirations in all these places

Follow Me on Pinterest


Monday 4 June 2012

Jubilee Crown Cake

Here is my Jubilee cake as promised. I made it using Peggy Porschen's Creamy Caramel Cake from her latest Boutique Baking book. Very delicious. I have made quite a few cakes from this book and am just pondering whether I should set myself a Julie and Juila style challenge to bake everything in the book.

Jubilee Crown Cake


This is a 6" three layer cake as popularised by Miette and Peggy.

Jubilee Cake


It was quite a rush to make it and you can see from the pic above, I haven't quite managed to get everything centred. I am sure it will soon get eaten at this afternoon's Jubilee tea party though.


That's all for today
Thanks for popping by and please call again soon

Keep up with my latest creations and inspirations in all these places

Follow Me on Pinterest