Sunday 8 December 2013

Daphne's Birthday Cake - my first time with cake lace


In my family Birthday cake is a sponge cake, maybe vanilla, maybe chocolate (check out mine from this year). Not so, in my husbands family. He thinks that Birthday cake should be fruit cake. Now, I am not going to say too much about my opinion on this, for the sake of marital harmony. Let us just say that I think a darkly spiced fruit cake is for Christmas or maybe a simnel cake at Easter. And also that one of the joys of bringing families together is introducing and combining traditions to make a family's new traditions.


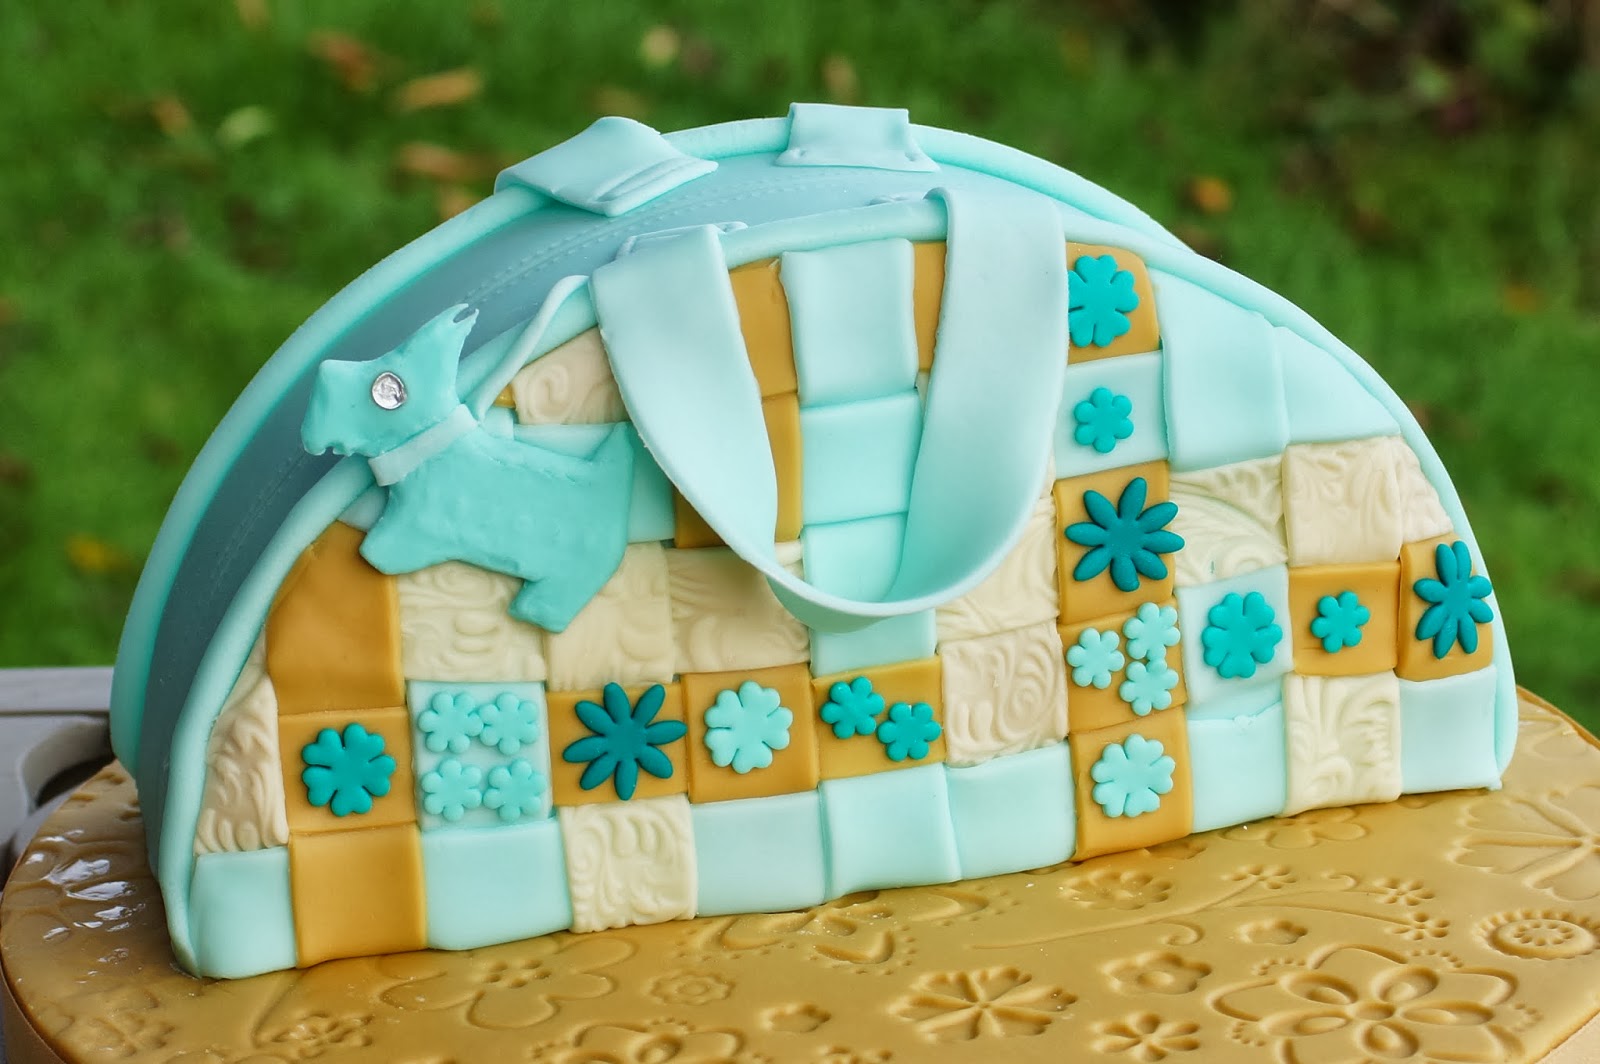
This cake then is for my mother in laws Birthday. At this time of year I think a Birthday cake has to try extra hard not to look Christmassy, which is why I chose this greeny-blue colour palette.


When I am decorating cakes, I love to see the way the different components come together and how the look of the cake changes and develops, so I am going to show you this cake from beginning to end. 

Starting with this six inch fruit cake. Before starting I compared the size of my lace to the height of the cake. I felt that the cake would make more of the lace if the cake was a little taller. To achieve this, I raised the cake up by using a six inch cake drum / board underneath to give it a little extra height.

Covering The Cake


Next comes the marzipan layer. Marzipan is a bit like the cake's underwear, smoothing everything out a little and providing a foundation for the fondant layer. Making it all look a little better. I'm not actually that fond of fruit cake, the marzipan is my favourite bit (and I love the cherries).


Now to add the colour of the fondant layer. I started off by colouring the fondant / sugar paste with Sugarflair's turquoise but, this was bluer that the colour I was looking for. I was after a pale teal or a dark eau de nil type colour, so I added some Sugarflair's Gooseberry to green the colour up a bit. I would say that I used about two parts of turquoise to one of gooseberry.

I should perhaps have spent a little longer smoothing this fondant and getting it perfect, but, as every busy Mum knows, this type of decorating has to be done after inquisitive pokey fingers have gone to bed and so time was a little limited. I have done what I hope is a competent enough job and with all the other additions on this cake, I don't think a few lumps, bumps and creases will be too obvious (I hope not anyway)


Adding the Lace

This is the first time that I have made cake lace. I bought a starter kit from the Cake decorating Company at this year's Cake International and had been looking for an opportunity to try it. More about making cake lace in a future post. The cake lace mat I used for this cake is called Chantilly.

I made the cake lace about a week before I decorated this cake. I stored it carefully laid out on sheets of baking parchment and then wrapped in aluminium foil.


I applied the lace to the cake by using a water pen to lightly brush water all over the back and then pressed it on to the cake, making sure I kept it level and straight. I then used the brush to wet underneath any areas that had not adhered properly.

You may notice that there are some little air bubble holes on these lace pieces. These are barely visible to the naked eye on the actual lace. They show up here because of the type of camera lens I use and possibly the size of screen you are viewing this on.


Flowers on the top

I had a thought to make a beautiful wired mini bouquet of sugar flowers to go on the top of this cake, but with only a few days to go till this cake needed to be gifted and given that I have, well, never actually made a wired bouquet before, I needed a different approach. 


The flowers are coloured with the same colours as the fondant / sugar paste used to cover the cake.

I always start by laying my flowers out on my work board before I start, so that I can get an arrangement that I am happy with before I start attaching the flowers to the cake. This arrangement of sugar flowers has a dogwood flower in the centre, surrounded by the larger flowers which are petunias and the smaller ones which are stephanotis. More about making these in future posts.


You can see that rather than attempting a wired bouquet, I have rested the sugar flowers on a little cushion of the coloured fondant left over from when I covered the cake. Without the height from the fondant cushion, the arrangement doesn't look quite right. You may also notice that when I decorated the cake, I decided to add some more of the small stephanotis flowers to hide more of the fondant cushion and also to make the overall outline of the flowers rounder in shape.


I'm really happy with the way this cake turned out. I'll finish off by saying Happy Birthday to my mother in law,  Daphne. I really hope you like your cake.


That's all for today
Thanks for popping by and please call again soon

Keep up with my latest creations and inspirations in all these places

Follow Me on Pinterest


Sunday 20 October 2013

Radley Handbag Cake - This is how I made it.

I have been looking for an excuse to make a handbag cake for a while, so I was delighted when the Radley Collector Facebook page ran a competition to bake them a Birthday cake and set about designing and making this one. In case you haven't heard of them Radley make the most beautiful handbags and the Radley collector page is their fan site. The Radley company was founded by Lowell Harder, an Australian, who first started selling her bags from a stall in Cambden Market, London in 1984. A particular feature of the bags is the leather scottie dog.


I only had a couple of days to make, decorate and photograph the cake before the closing date, so I needed a design that was simple to make but still look effective, so decided to avoid any risky cake carving and took inspiration from the colours and textures of this one of my Radley handbags.

@radleylondon one of my favourites, well used and nicely worn in. About 5 years old #radley #OldBag

This is how I did it

I started off, by baking an 8 inch round cake, cutting it in half and sandwiching one half on top of the other with some buttercream and jam, then trimmed the edges level and covered the cake with a crumb coat of buttercream and then with pale blue fondant.


Next, I set about making fondant strips for the basket weave effect on the front of the cake. I found that the easiest way was to roll a sausage of fondant, which I then rolled flat and about 2mm thick with a small rolling pin. It was a humid day, in my kitchen, so you will see quite a bit of icing sugar sprinkled about to stop the fondant getting sticky.


Next I used a ribbon butter to cut the strips, about 2cm wide. This ribbon cutter is by FMM.


To add some texture to some of the strips, I used an embossing mat on the ivory coloured fondant. This one is from the Autumn Carpenter Dress Cookie Cutter Texture set. I haven't used that set for ages, must cake some more dress cookies soon. If you want to take a look at the set in action, take a look at my dress cookies, from ages ago, here.


After cutting plenty of ribbons, it was time to start weaving. The colours I have used here are

Blue - Squires Kitchen Bluegrass
Ivory - Sugarflair caramel/ivory
Caramel - Sugarflair caramel/ivory and Sugarflair Autumn Leaf


Now, time to start weaving. I started with a strip across the bottom, then added the vertical strips alternately laying one on top of the bottom strip and one underneath.


Before laying the next horizontal strip, I carefully folded forwards every other vertical strip, placed the horizontal strip across, then folded back the folded forwards strips and folded forwards the ones that weren't. Sounds complicated, but actually not.


I continued to weave the strips until all of the front was covered. I used a pair of clean kitchen scissors to trim the ends around the curve at the top and then squeezed out some long sausages from my sugar shaper to hide the join and added a matching sausage at the back.


I wanted a zip across the top of the bag. As I don't have a zip mould, I used a cutting tool to mark the zip and a stitching tool to add a line of stitching either side. After all, on a quality bag, the zip is carefully concealed under folds of leather.


I cut out a variety of small sugar flowers and arranged these on the front of the bag to be reminiscent of those on the real bag.


I added some handles with more strips of fondant and a little more stitching detail for added realism.


Now, for the all important Radley dog. I didn't have a dog shaped cutter, so this posed a bit of a challenge. After giving the matter some thought, I used one of my actual Radley handbag dogs to make an impression on some sugar paste, then carefully cut around the shape and used a ball tool to gently soften and neaten the edges.

My Radley is a little large for his bag and if I had the time, or access to a photocopier, I would have taken a reduced photocopy and used this as a template. The writing on the dog is, of course, a mirror image, but it is so small, in real life, I don't think you really notice.


I am really happy with the way this bag turned out. Especially for the first handbag cake I have made. I would have preferred to use an oval shaped cake board, but as I didn't have one to hand, a round one had to do.

That's all for today
Thanks for popping by and please call again soon

Keep up with my latest creations and inspirations in all these places

Follow Me on Pinterest


In case you are wondering, I didn't win the competition, a cake entered by Melli Peakman won. Congratulations, Melli.

Sunday 11 August 2013

Anemone Flowers


One of my aims for this year is to learn to make more sugar flowers. I have been practising some blossoms, these have been going OK, So I have moved on to something a little more complex. The anemone.

This is the first time I have made anemone flowers, it took me a while to find a cutter set that I liked, many of the ones I found were smaller than I wanted, I eventually settled on this one by JEM.

Equipment

To make the flowers, you will need

Petal or gum paste for the petals (I used Squires Kitchen Sugar Florist Paste in pale pink)
Contrasting gum or petal paste for the flower's centres.
Anemone Cutter
Rolling pin
A plastic wallet cut down the edges
Ball Tool
Petal veining tool
Foam sugar craft pad
A little vegetable fat (TREX or Crisco)
A little cornflour / cornstarch
Flower formers
Packing material
A little edible glue or a water pen
Stamens for sugar flowers (I got mine from a local sugar craft shop, note that these are not edible)
Sanding sugar

Method
1. Smear a little vegetable fat on to your work surface, this helps the petal paste stick and also helps it not to stick (strange but true)

2.Roll out the petal or gum paste as thin as you can. You should be able to see through it. I can never get mine quite that thin, but I keep trying

3. Use your cutter to cut your flower shapes and giving them a little wiggle as you cut to ensure clean edges


4. Once cut, lift the petal shapes and put them inside a plastic wallet to stop them drying out.


5. Sprinkle a little cornflour onto the foam pad.

6. Take the first, largest, petal piece and ball tool around the edges to thin them out and frill the petal a little. The ball tool should be half on and half off the petal 


7. Use the veining tool to add veining to the petals. 

It is usually recommended that you vein then ball. It is one of those no win situations. The balling takes the veining out a bit and the veining takes the ball tooling out a bit. Sometimes, I ball, vein and then ball again!


8. Place the flower in a flower former to dry. If necessary use some little cut up pieces of those packaging bits to prop the petals up and make the flowers a nice shape


 9. Ball tool and vein the next flower piece, use a little water of edible glue in the centre of the first petal layer and arrange the next layer on top.

10. Use some more cut up bits of packing pieces to arrange the petals nicely


11. Repeat for the final layer


12. Roll a small piece of petal paste for the centre into a ball and then flatten it slightly
13. Cut the stamens to about 1cm
14. Dip each stamen into edible glue and then push around the edge of the centre
15. Brush the top of the flower centre with edible glue, then dip it into the sanding sugar.
16. Stick the centre onto the flower using water or edible glue

Leave them to dry for at least a few hours, preferably overnight and they are all finished and ready for your cake


That's all for today
Thanks for popping by and please call again soon

Keep up with my latest creations and inspirations in all these places

Follow Me on Pinterest


Sunday 14 July 2013

Beehive Cake


This is the second of two charity cakes that I told you about a while back. It is not the most original of cakes, but it is sweet in every sense of the word. There is a lovely beehive cake that Martha Stewart makes, she drizzles hers with a sticky honey glaze and bakes it in her own pan which is no longer made. The Martha Stewart pan is highly sought after, there is a campaign to try and bring it back and I saw one change hands recently on ebay for almost $300!

Not having the budget for a vintage Martha tin, I got mine from Nordic Ware. I decided to try a recipe that Peggy Porshcen uses for her Bundt tin cakes. A lemon, poppyseed and almond cake from her Boutique Baking book. If you want the recipe, you will need to buy the book, it will be worth it, this book is amazing.


I had it in my head that I was going to hand mould some bees out of yellow fondant, paint on some stripes, make some wings, then I remembered that I had this lovely Butterfly and Insect Brooch mould by Karen Davies, so I saved myself a bit of time and moulded a few bees.


Here is a little moulded bee. I moulded the bees using a ready made modelling paste from Squires Kitchen.


And a painted bee. I love the way a little colour brings the moulds to life and gives them so much character.

To colour the bees:


  • I brushed Sugarflair's primrose yellow petal dust over the body of the bee;
  • Painted stripes with confectioners glaze coloured with black gel colour and
  • Brushed the wings over with Squires Kitchen fairy sparkle


To make the cake look extra special:
  • I placed it on a double board (two cake drums stuck on top of each other);
  • Wrapped the boards with two colours of ribbon and 
  • Used a stylised rose impression rolling pin to pattern the fondant used to cover the board

I think this is my favourite impression pin and even though the design is of roses, I think it has something of the bee about it too.


And finally, the finished cake


That's all for today
Thanks for popping by and please call again soon

Keep up with my latest creations and inspirations in all these places

Follow Me on Pinterest

Saturday 29 June 2013

Giant Chocolate and Caramel Cupcake


I was telling you about the cakes I was making to be raffled for charity, this is The Giant Cupcake. It is a chocolate sponge topped with caramel frosting and then decorated with sugar flowers. You can find out more about the sugar flowers here


This giant cupcake was in response to popular demand, as a lot of my friends and colleagues had asked for a giant cupcake. I wanted to make a beehive cake. In the end I made both, more about the beehive cake next time.


I have made a couple of vanilla Giant Cupcakes before including this Alice in Wonderland themed one, so I decided to go for chocolate instead. I added caramel flavouring to the buttercream by stirring in some, well, almost a whole jar, of Dulde de Leche.

The wrapper part of the giant cupcake is covered in chocolate sugar paste.

My hubby said that he thought that this was the nicest cake I have ever made :o). 


That's all for today
Thanks for popping by and please call again soon

Keep up with my latest creations and inspirations in all these places

Follow Me on Pinterest


Sunday 23 June 2013

Blossomology Part two - with a little help from our talented friends


A month or so ago, I was asked to make a cake to be raffled at my workplace for charity. I felt so honoured to be asked, but, also a little unworthy, after all, its just me, so I really wanted to pull out all the stops and make a cake that I could feel really proud of and tempt all my lovely friends and colleagues into spending lots of money on raffle tickets.

I had two cakes in mind that I wanted to make. Many of my friends and colleagues were asking for a giant cupcake, as I had recently made one, for a colleague, as a parting gift. The cake that I wanted to make was a beehive cake.

In the end, I decided to make both. This was also an opportunity for me to practise some more sugar flowers and these are the sugar blossoms that I made to decorate the Giant Cupcake. More about that Giant Cupcake in the next post.


In blossomology I wanted to try and make lots of different blossoms from the same cutter, to practise some different skills. We are very lucky in the cake decorating world that there are so many great companies and talented crafters out there making kits and tools, that, even those, like me, with little artistic talent, can make sugar flowers. One of my favourite companies is Sunflower Sugarart they have UK and USA websites. I have used their blossom mould and cutter set to make these sugar blossoms.

To make these blossoms I used:

The blossom set from Sunflower Sugarart
A small rolling pin
A cutting board or mat
Petal / Gum Paste coloured with Sugarflair's Ivory / Caramel
A small about of vegetable fat (Trex / Crisco)
A small amount of cornflour / cornstarch
A foam sugarcraft pad
Lustre dust, I used Edible Arts Pearlised Toffee

This is how:

1. Rub a little of the vegetable fat onto your cutting board. This helps the petal paste stick whilst you are rolling and cutting and helps it not stick at the same time.

2. Roll out petal paste, really thin. Officially, it is supposed to be so thin, you can seen through it, but I usually go a little thicker

3. Use the cutter to cut out a blossom and give the cutter a little wiggle to neaten the edges.


4. Sprinkle a little cornflour on your foam pad, then place the cut blossom on top. Use a ball tool around the edges (half on / half off) to thin and frill them a little. This helps make the blossoms look more natural and realistic, you can omit this stage for a more stylised blossom.


5. Lift the blossom and place it on the bottom half of the mould. Use the ball tool to help settle it in position


6. Press the two halves of the mould together to impress the veining onto the blossom


7. Gently lift the moulded blossom out


8. Brush with a little petal or lustre dust to add a little magic


9. Settle the veined blossoms into the wells of a paint palette to dry out and harden out.


I wanted to make some smaller flowers too, so I used one of my Orchard Products cutters with the sunflower Sugarart veiner to make some smaller ones.


Sweet little things aren't they?


Check back soon to see these on the Giant Cupcake


That's all for today
Thanks for popping by and please call again soon

Keep up with my latest creations and inspirations in all these places

Follow Me on Pinterest